Forala Editor Image Upload Url S3 Signed Url
![]() Print
Print
Introduction
When you have configured a Clip or Channel to be private, the WebTV will restrict the access to it by requiring the user to log in; however, in one case an user has logged in, if it has enough technical knowledge, information technology can find a way to get the URLs to the video files and share them with other people. Since the WebTV tin't restrict the admission to the files, then anyone who has the URLs of the files will be able to access and download them (without logging into the WebTV).
Protecting your files using Amazon CloudFront
If you are using Amazon S3 and CloudFront to store and serve your video files, then yous must know that CloudFront allows you to restrict the admission to them by using "signed URLs". When you have configured your CloudFront distribution to restrict the access, then no one will be able to access a file without the right signed URL (which is an URL with some unique parameters). Signed URLs tin specify a time expiration (after which it will not piece of work anymore) every bit well as the IP of the user allowed to access (an user with a different IP will non be allowed to access) - Important: Read more than regarding expiration time and IP restriction at the lesser, in the "Integration Details, Avant-garde Configuration" paragraph.
WS.WebTV signed URL generation
Since WS.WebTV 1.v.one, yous tin use CloudFront signed URLs on WS.WebTV to complement the WebTV authentication system and become a better protection for your video files. When using in conjunction, the WebTV will automatically generate the signed URLs (in the background) simply for users logged in which are allowed to access the content; additionally, past default, the signed URLs will restrict the access using fourth dimension expiration besides as the electric current user IP; therefore, fifty-fifty if the user is able to become the bodily URL to a file, no one else will be able to use information technology.
Configuring S3+CloudFront
In case you lot don't already have cretated a bucket in Amazon S3, start by creating 1 (from the Amazon AWS Console) to shop your individual content.
NOTE: Information technology is recommendable not to share, publicly, the URL of your S3 saucepan.
The whole bucket (or at least the files in the bucket) must be private
When y'all upload a file to the S3 bucket yous must make sure you accept not maked information technology public.
You have two means of doing this:
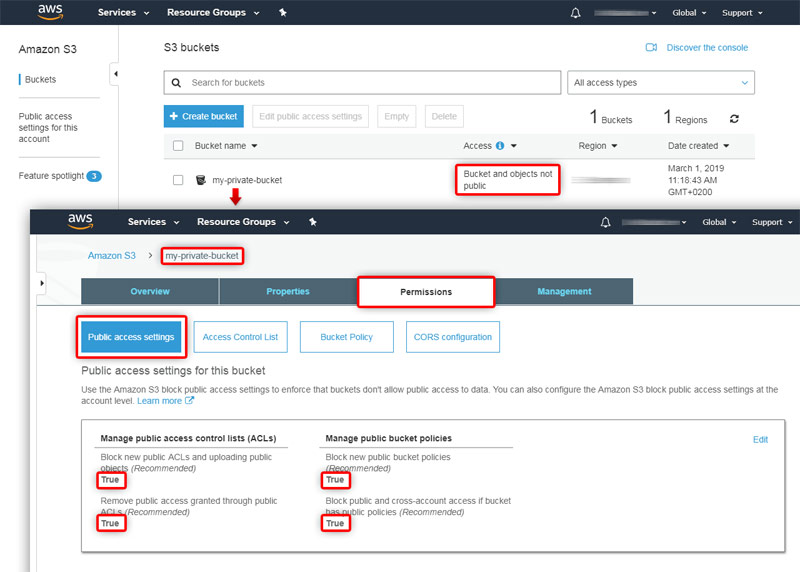
1. Using a "not public" bucket (run into the image below). This is the ideal instance where y'all have a bucket exclusively for storing private/restricted objects. Basically you must set the bucket permission then that goose egg is public.
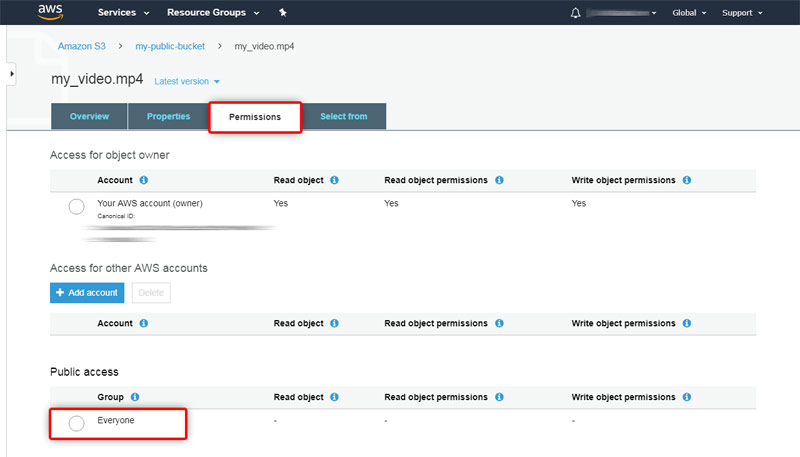
2. Using a public saucepan (where objects tin be public and individual) but making sure that the uploaded files practise not accept annihilation allowed for "Public access" nether the Permission settings.
Example of a fully private bucket:
Example of private file (in a public bucket):
Uploading individual video files from WS.WebTV
If you lot are uploading private video files from the WebTV (this means you lot have configured video storage to be AWS) you will need to configure the WebTV to set the privacy of the uploaded files as "private". Edit the WebTV configuration file (config/Config.inc.php) and add the post-obit variable before the PHP endmost tag (?>):
$AWS_VIDEO_UPLOAD_ACL = "private";
Creating CloudFront Distributions with Access Restriction
Once you have a bucket for storing the video files, you need to create the CloudFront Distributions (they will be in charge of serving files). In that location are two types of distributions:
Spider web distribution: Intended for playing back video files, using progressive download/pseudo streaming, on the HTML5 video role player.
RTMP distribution: Intended for playing back video files, using streaming, on the Flash video player.
We recommend creating one "RTMP" Distribution for Wink and some other "Web" Distribution for HTML5 and download.
Creating a CloudFront "Spider web" Distribution for playing back videos in HTML5
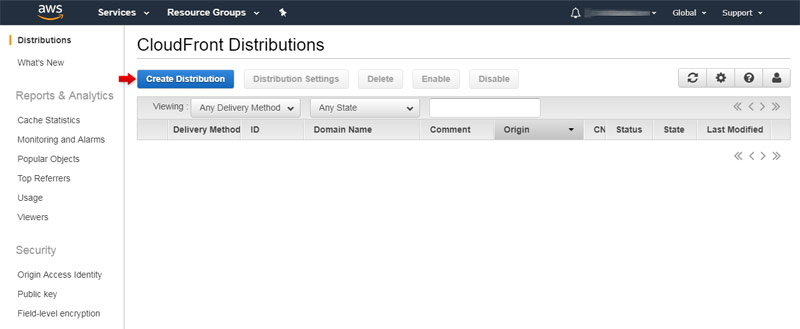
Go to your AWS Console and go to CloudFront, then click the "Create Distribution" push:
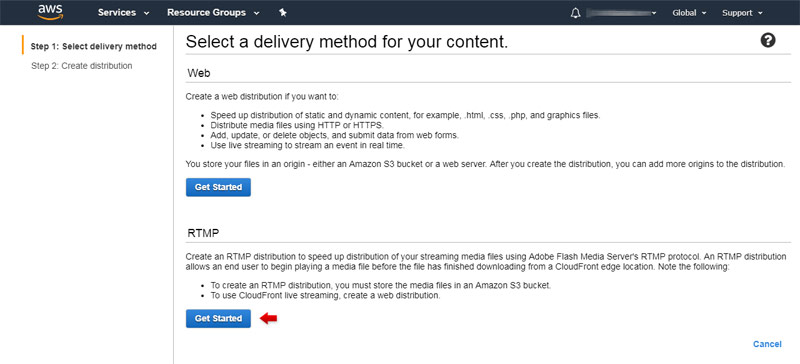
In the next screen click "Get Started" inside the "Web" option:

In the next screen gear up the Distribution options.
Notation: Nosotros will only focus on the private distribution aspects; for information regarding other options, check the CloudFront documentation.
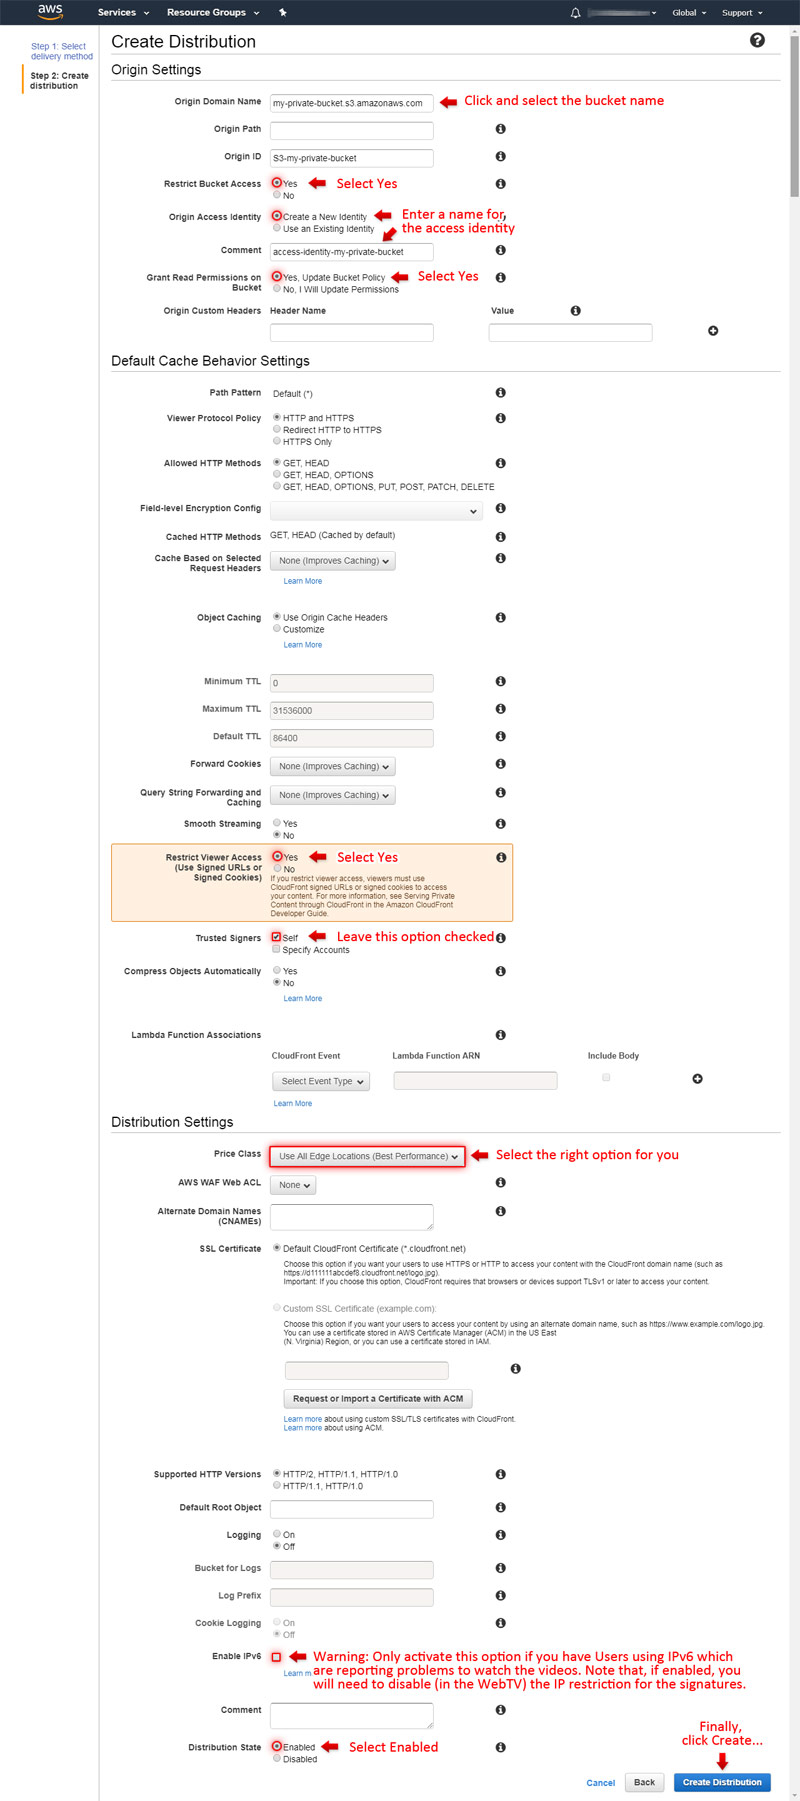
Brand sure all options are set correctly and click "Create Distribution".
NOTES:
- Afterwards creating, return to the CloudFront distribution list and write downwardly the "Domain Name" of the new distribution; yous will demand it at a later time.
- Distributions take several minutes to be enabled.
The resulting Domain Proper noun for the new CloudFront distribution would exist something similar d#############.cloudfront.net (starting with letter "d").
Write the domain proper noun it downward because you'll need it in the following steps.
Creating a CloudFront "RTMP" Distribution for playing dorsum videos in Flash
Become to your AWS Console and access CloudFront, then click the "Create Distribution" push:
In the next screen click "Go Started" inside the "RTMP" option:
In the adjacent screen set the Distribution options.
Note: We will only focus on the individual distribution aspects. For information regarding other options, check the CloudFront documentation.
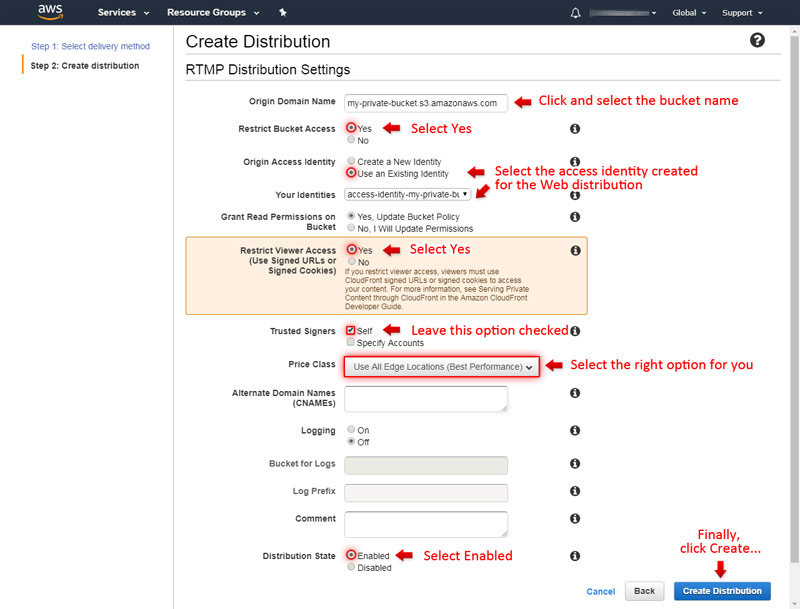
Brand certain the options are correctly set and click "Create Distribution".
NOTES:
- Later on creating, return to the CloudFront distribution listing and write down the "Domain Name" of the new distribution; you lot will demand it at a later time.
- Distributions take several minutes to be enabled.
The resulting Domain Name for the new CloudFront distribution would exist something like s#############.cloudfront.net (starting with letter "southward").
Write the domain name it down considering you lot'll need it in the following steps.
CloudFront Credentials
The next step is to get your CloudFront credentials and configure the WebTV to use them (the credentials volition exist used to "sign" the URLs of the files).
Getting your CloudFront Credentials
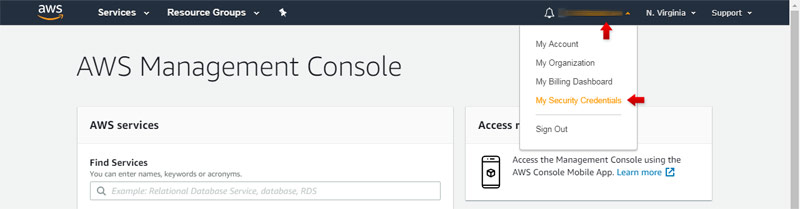
*** Notation: You must have logged in using your AWS Console root credentials ***
Click your Business relationship Proper name (at the elevation) and select "Security Credentials":
In the next screen, unfold the "CloudFront Fundamental Pairs" section and click the "Create New Cardinal Pair" push button:
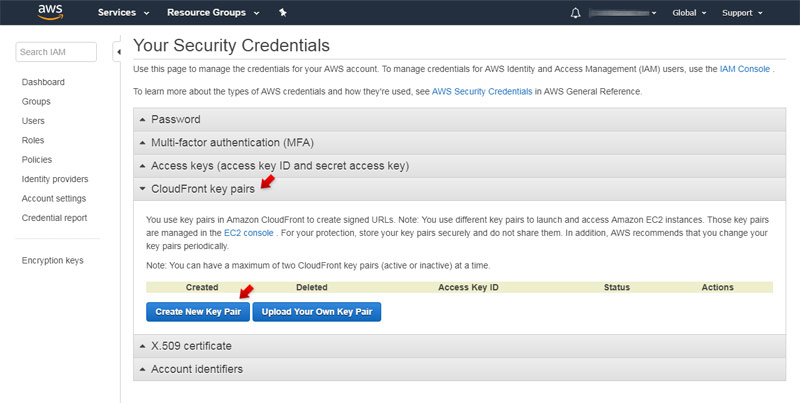
Of import: After clicking the "Create New Key Pair" push, a window volition appear notifying yous the Key Pair was cerated and offering the option to download the Key files. Y'all must write down your Admission Cardinal ID and download the primal files.
Configuring the WebTV to use the CloudFront Credentials
The first thing you need to do at present, is to upload your private key file to your WebTV's config/ folder.
Important NOTE: The private key file downloaded from Amazon includes the Key-Pair-Id in its proper name; for security reasons, we strognly recommend that you lot rename the private key file name to include some random numbers or messages. So, if -for example- the downloaded file is pk-AJKAI5XNI8UFLW5E38W7.pem, rename it to pk-AJKAI5XNI8UFLW5E38W7-some-random-numbers.pem.
In order to supply the WebTV your credentials you must edit the WebTV configuration file (config/Config.inc.php) and add the Key Pair ID and proper name of the Individual Central file equally follows, earlier the PHP endmost tag (?>):
$AWS_CF_CREDENTIALS["unique_id"] = "Fundamental-Pair-Id,Private_key_file_name";
unique_id: A proper noun to access the the credentials. This is because the WebTV can use multiple credentials if required; if yous are only using i, and then unproblematic apply cf1
Cardinal-Pair-Id: This is the Admission Key ID; it should be something like this: AJKAI5XNI8UFLW5E38W7
Private_key_file_name: The name of the Private Key file you must take uploaded previously to your WebTV'due south config binder; it should be something similar this (after you renamed it): pk-AJKAI5XNI8UFLW5E38W7-8998741258991.pem
Example:
$AWS_CF_CREDENTIALS["cf1"] = "AJKAI5XNI8UFLW5E38W7,pk-AJKAI5XNI8UFLW5E38W7-8998741258991.pem";
Referencing/Playing Back Individual Video Files Using CloudFront Signed URLs on WS.WebTV
At present that you take created your CloudFront Distributions, got your credentials info and configured the WebTV to use them, you are ready to reference your files in the WebTV!.
Unsing StreamClip VOD
By this fourth dimension, yous should be familiar on how to create and edit a StreamClip. If this is not the case, please check the "StreamClip VOD" tutorial before continue reading.
H.264 Flash Streaming (RTMP Distribution)
If your file has ".mp4" extension, the URL to supply to the corresponding quality (Flash slot) would be like this:
[cfsig] rtmp://s#############.cloudfront.cyberspace:1935/cfx/st/ mp4:video-file-name.mp4
Example: [cfsig]rtmp://s#############.cloudfront.net:1935/cfx/st/mp4:my_private_video.mp4
Delight, note the "[cfsig]" at the get-go of the URL and "mp4:" before the file proper noun. Additionally, you lot'll need to utilize the respective domain proper name.
HTML5/Progressive Download (Web Distribution)
If your file has ".mp4" extension, the URL to supply to the corresponding quality (HTML5 slot) would be similar this:
[cfsig] http://d#############.cloudfront.net/ video-file-name.mp4
Example: [cfsig]http://d#############..cloudfront.net/my_private_video.mp4
Please, notation the "[cfsig]" at the start of the URL. Additionally, you'll need to use the respective domain proper noun.
Unsing Standard Clip (AWS Integration)
This is done by introducing the corresponding Base URL formulas into Configuration > Video
Flash Formula
The URL Formula to enter into the corresponding quality (Flash slot) would exist like this:
[cfsig] rtmp://s#############.cloudfront.net:1935/cfx/st/ mp4:{filename.ext}
Please, note the "[cfsig]" at the beginning of the formula and "mp4:" before the special characterization.
HTML5 Formula
The URL Formula to enter into the corresponding quality (HTML5, or Wink. slot) would be similar this:
[cfsig] https://d#############.cloudfront.net/ {filename.ext}
Delight, note the "[cfsig]" at the beginning of the formula.
Integration Details, Advanced Configuration (expiration time and IP restriction)
Integration details
As you could come across; in order for the WebTV to use signed URLs it requires the CloudFront URLs to accept the "[cfsig]" prefix. When WS.WebTV finds that special tag, it signs the CloudFront URLs (in the groundwork) using the credentials provided in the configuration file.
Advanced Configuration
As nosotros explained at the first of this document, the signed URLs apply an expiration time and the current user IP; you can change the options past editing the WebTV configuration file (config/Config.inc.php) and adding the post-obit variables, before the PHP closing tag (?>):
$AWS_CF_SIGNED_URL_EXPIRATION = 3600; // The signed URL will stop working one time this time (in seconds) has elapsed (3600 = 1hr)
$AWS_CF_SIGNED_URL_RESTRICT_USER_IP = true; // To restrict the signed URLs by user IP. Options: true, false
Of import Note: If you are using IPv6 support in the CloudFront restricted distribution then, and then that the Users with IPv6 can watch the content you volition need to disable the IP brake. If yous don't think that IPv6 support is important and so disable it for the CloudFront distribution.
Signed Download URLs (Clips with video download option enabled)
For WS.WebTV version ii.0 and newer
When you enable the "Download" menu for a Prune, and information technology has been set as "Yep, WebTV Files" or "Yep, WebTV Files + Other Files", and the HTML5 quality fields reference .mp4 files (from a "Spider web" CloudFront distribution) the system will automatically generate the corresponding (signed) download URLs for those files. Although the previous, in case that, in the "Download" carte du jour of a Clip, y'all want to provide links to files which are different that the ones referenced in the HTML5 qualities fields, and those files besides crave signed URLs then follow steps ane and 2 of the following section.
For WS.WebTV versions prior to ii.0
If you plan to enable the "Download" card for a Prune and yous want to provide a (private) CloudFront URL to a file -so it can only be downloaded by authorized users-, then you need to use a special URL generated past the WebTV, which volition sign the URL so that authorized users tin can download the file.
In gild to enable the "Download" menu for a Clip which uses private CloudFront URLs, follow these steps:
ane. On "Show download menu", select "Aye, Other files".
ii. Supply manual download link(south): Download links must be genarated using the WebTV Signer URL generator utility of the WebTV. In order to run the utility, open the post-obit URL in a Spider web browser (replace your WebTV URL):
http://<url_of_your_webtv>/index.php?go=ajax&practise=genawscfsignerurl and supply the corresponding CloudFront Spider web distribution URL. For example:
The following CloudFront URL:
http://d1g31os05ijtr3.cloudfront.net/private_video.mp4
Will be transformed (past the utility) to something like this:
http://<url_of_your_webtv>/alphabetize.php?go=ajax&do=getawscfsignedurl&iq=,,http%3A%2F%2Fd1g31os05ijtr3.cloudfront.internet%2Fprivate_video.mp4&tp=download
The transformed URL will be the one that you must enter into the "Other Files" field
Source: https://www.webtvsolutions.com/support.php?s=ws_webtv_docs&d=clips_streamclip_vod_cfsigned&lang=en
Post a Comment for "Forala Editor Image Upload Url S3 Signed Url"